Kimberly Servello's Embroidery Blog

Kimberly Servello - Pattern Drawer and Embroideress

Friday, February 24, 2012

Progress Continues On Enchanted Shawl


“I made my song a coat
Covered with embroideries 
Out of old mythologies...”

Yeats


Although I've completed another section of embroidery on the 
shawl, most of the motifs 
are repeats of those I've already shared with you, so I haven't included photos of them.  


I did decide to add stamens to the rose, which you can see peaking out from under a petal here..


I'm more pleased with my second attempt at Long & Short stitch.  Someday I may invest in Trish Burr's dvd's.  I'm sure I could pick up some tips from her gorgeous work.  This shawl will help me to determine if L/S stitch will become a standard of my embroidery "vocabulary".  


I think L/S is a beautiful stitch, but not as fun to do as the other Elizabethan/Jacobean stitches.  I enjoy the variety of the other stitches - choosing which stitch will more closely represent the texture you need for a motif, or using raised stitches to give something more "pop".  The joys of embroidery....

Wednesday, February 22, 2012

Van Dyke Stitch with Reverse Chain Start

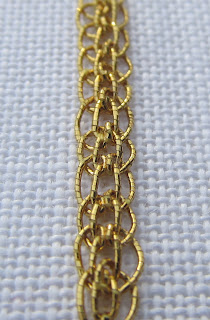
Van Dyke stitch is best worked in metal threads or tightly twisted cotton or silks.

For this tutorial, #371 gold wire was used to create a leaf motif.

It could also be used to create veins on a leaf worked in silk, as shown below.


Start out with a few Reverse Chain stitches (reference Reverse Chain tutorial if you aren't already familiar with this stitch).


For Reverse Chain, the working thread is brought to fabric surface, looped around the previous chain stitch, and then plunged to the back of the fabric through the same hole.  To create the legs in Van Dyke, the working thread is brought to fabric surface slightly to the left of the chain stitched row (working towards your body), looped around the previous chain stitch, and then returned to the back of the fabric, slightly to the right of the chain stitches.  See photo, left.


As you create each loop or chain, increase the distance between the legs as shown here.


Keep a firm, but not tight, tension.  Pull only enough to keep the "legs" straight.


If creating a shape such as this one, you will begin to reduce the length of the legs as you come to the final point and the last stitch will be a Reverse Chain.


Sunday, February 12, 2012

Valentine's Day Curio

" Come live with me and be my love,
And we will all the pleasures prove,
That valleys, groves, hills and fields,
Woods or steepy mountains yields...

And I will make thee beds of roses,
And a thousand fragrant posies,
A cap of flowers and a kirtle
Embroidered all with leaves of myrtle..."

from The Passionate Shephard to His Love by C. Marlowe


The embroidery for this cone is blackwork, probably my favorite reversible pattern.  The pattern was taken from Portrait of a Lady in White c. 1540 in the National Portrait Gallery, DC.


Here, it's stitched on 40 ct. linen, with one strand of DMC embroidery floss.  

The hem is the Rolled Hem shown in my Stitch Tutorials.  To make an area to weave the ribbon through, I withdrew threads and then hemmed the linen on either side with tiny hem stitches.

The linen must be seamed up one side to form a tubular top for the cone.  I used a plain hand-sewn seam.  In hindsight, I could have used this small area to try an Elizabethan seam such as the seam detail shown on a jacket at the V&A.  Another time.

The cone itself was made from a sheet of Anna Griffin paper from Michaels, and trimmed with cotton lace from JoAnn Fabrics.  Here's a link to a template you can use to make your own cone.  (When you trace/cut it out, do not include the 2 tabbed handle areas.)


Happy Valentine's Day!


Friday, February 10, 2012

Reverse Chain with Buttonhole Edge Tutorial


Reverse Chain with Buttonhole Edge can be worked in metal threads or silk/cotton perle.  

The Buttonhole Edge can be worked on both sides of the Reverse Chain Stitch, or one side only.

It's a nice stitch for linear motifs such as vines & plant stems.

For this tutorial it has been worked in 371 gold wire by Golden Threads using a #24 tapestry needle on 50 ct. Kingston linen. 

(Note: I apologize for the extra spacing throughout this tutorial.  Blogger would not allow for proper formatting). 


Begin by stitching a row of Reverse Chain (if not familiar with this stitch, see my Reverse Chain Tutorial).

Upon completion of the Reverse Chain, bring the thread to fabric surface slightly below your last chain, as shown in photo to right.


You will be adding a Buttonhole stitched edging to the Reverse Chain. 

To do this take the needle up through the 2nd chain as shown at left...


Then down through the first chain.  Make sure the needle is overlapping the working thread as you pull it through the chain (as shown in the photo at right).


 This creates the first buttonhole stitch.


Repeat the process by taking the needle up through the 3rd chain, 


  and back down through the 2nd chain.


  Two buttonhole stitches have been completed.  


Repeat these steps for the rest of the chain stitches.


 When you reach the last chain stitch, take the thread to the back of the fabric.  This completes Reverse Chain with a Single Buttonhole Edge.


To work a Double Buttonhole Edge simply repeat the process for the opposite side of the chain stitches, starting with the last chain shown in this photo.


Wednesday, February 8, 2012

Rose Motif on the Enchanted Shawl


“...and with her neeld (needle) composes
Nature’s own shape, of bud, bird,     branch, or berry,
That even her art sisters the natural roses;
Her inkle, silk, twin with the rubied cherry...”


Shakespeare -  Pericles


The inspiration for the techniques used on my rose motif came from a pillow cover (Acc no. 43.254)  at the Museum of Fine Arts, Boston .   The museum's online photo doesn't do justice to the embroidery.  The pillow case has many, what I am terming, 'semi-raised' motifs...meaning that they're technically raised embroidery, but not as 3-dimensional as you find on the period caskets.   Various techniques were used to achieve this effect, which I plan to incorporate in my shawl.  These work wonderfully where you want a somewhat 3-dimensional representation, but need to take into consideration that this is a piece that will ultimately be worn.  The semi-raised motifs greatly reduce the peril of snags!


The stem is worked in Reverse Chain with Single Buttonhole Edge.  I chose this because I felt the Buttonhole Edge gives the fibrous appearance of an actual rose stem.


The dark green leaf on the stem and the sepals (modified leaves at the base of the flower) are Detached Buttonhole.


The yellow, 'under petals' are worked in Detached Buttonhole.

The red petals are worked in both Detached Buttonhole and Needlelace.  They were executed in place, on the shawl, necessitating that they be worked before the under petals.

I added the green, stem stitched accents because I felt the red petals needed one, and they are meant to imitate a striated rose petal.


The last photo gives you a peek into the inside of the rose.  I feel there should be a pleasant curiosity here, so I will be adding stamens - probably worked in Bullions.

I used Au Ver a Soie Perlee in the following colors:
499 red
241 yellow
199 pistachio green
491 dark green (leaf on flower stem)